HTML Waitlist Integration
Why use LaunchList with plain HTML?
If you're running a hand-built HTML site, a static site (Hugo, Jekyll, Eleventy, Astro), or any platform not listed elsewhere — this is the universal integration. Two lines of code deliver a full viral waitlist with referral tracking, spam defense, and a live leaderboard.
What you get:
- Works on any site — static, PHP, Rails, Django, Hugo, Jekyll, Eleventy, Astro, or hand-coded HTML
- Viral referral program — every signup gets a unique referral link that moves them up the waitlist
- Fraud detection — disposable email blocking, MX validation, and behavioral scoring on every submission
- Two integration modes — pre-built embed widget (fastest) or custom form (full design control)
- CSV export — download your full list any time
- Free plan — up to 100 submissions, no credit card required
Setup takes under 2 minutes — just paste the script and widget div anywhere in your HTML.
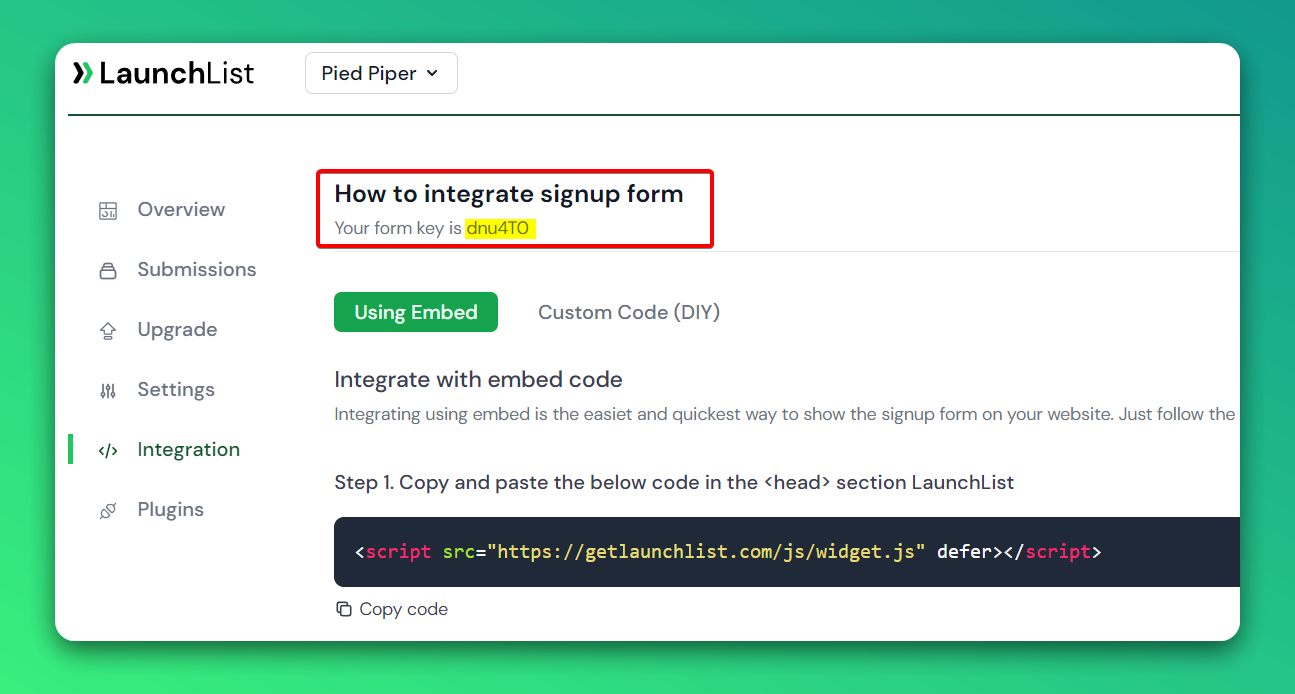
Step 0 - Get form key
To integrate the embed widget on the HTML website, first, you need a LaunchList form key which you can get from integration page.
Embed Widget
Step 1 - Add a widget script into <head> section of your website
- Add the below script into the
<head>section.
<script src="https://getlaunchlist.com/js/widget.js" defer></script>
Step 2 - Add the form code where you want to display the form
- Make sure you have replaced the FORM_KEY with your key from step 0 in the below code
<div class="launchlist-widget" data-key-id="FORM_KEY" data-height="180px"></div>
Once set up, you'll see instantly see the widget on your website.
Codepen embed widget example
Custom Form
Step 1 - Add a widget script into <head> section of your website
- Add the below script into the
<head>section.
<script src="https://getlaunchlist.com/js/widget-diy.js" defer></script>
Step 2 - Build your form
- Customize the form with your CSS
- You can add multiple input fields if want to collect extra details
- Make sure your form has a class name "launchlist-form" and the method is set to "POST"
- Make sure you have replaced the FORM_KEY with your key from step 0 in the below code
<form class="launchlist-form" action="https://getlaunchlist.com/s/FORM_KEY" method="POST">

    <input name="name" type="text" placeholder="Enter your name" />
    <input name="email" type="email" placeholder="Enter your email" />

    <button type="submit">Join Waitlist</button>

</form>
Once set up, you'll see instantly see the widget on your website.
Codepen custom code example
Popup
Step 1 - Add a widget script into <head> section of your website
- Add the below scripts into the
<head>section. - widget-diy.js is used to handle referrals.
- popup.js create the popup modal.
<script src="https://getlaunchlist.com/js/widget-diy.js" defer></script>
<script src="https://getlaunchlist.com/js/popup.js" defer></script>
Step 2 - Build your form
- Customize the form with your CSS
- You can add multiple input fields if want to collect extra details
- Make sure your form has a class name "launchlist-form-popup" and the method is set to "POST"
- Make sure you have replaced the FORM_KEY with your key from step 0 in the below code
<form class="launchlist-form-popup" action="https://getlaunchlist.com/s/FORM_KEY" method="POST">

    <input name="name" type="text" placeholder="Enter your name" />
    <input name="email" type="email" placeholder="Enter your email" />

    <button type="submit">Join Waitlist</button>

</form>
Step 2 - Add Javascript to handle submission
- Add the below javascript code before
</body>
// get all forms. This is to handle multiple forms in the same page
let forms = document.querySelectorAll(".launchlist-form-popup");
// submit form
forms.forEach((form) => {
    form.addEventListener("submit", function (e) {
        e.preventDefault();

        // Get the action url of the form
        let action = form.getAttribute("action");

        // Get the form data
        let formData = new FormData(form);

        // Submit the form
        fetch(action, {
            method: "POST",
            body: formData,
            headers: {
                Accept: "application/json"
            }
        })
        .then((response) => response.json())
        .then((data) => {
            console.log(data);
            if (data.ok) {
                // replace iframe src
                let iframe = document.querySelector(".launchlist-iframe");
                iframe.src = data.embeddedLink;
                // show modal
                toggleModal();
            } else {
                // You can catch error here
                // alert(data.error);
            }
        })
        .catch((error) => {
            // You can catch error here
        });
    });
});
Once set up, you'll see instantly see the widget on your website.
Codepen custom code example